Objectives
The objective of this post, is to create an extremely simple RESTful Web Service using Java EE (Enterprise Edition) that maps HTTP POST, GET, PUT and DELETE methods (which are CRUD operation; Create, Read, Update and Delete respectively) to a single resource that is persisted to a MySQL Database. The intention is to create a starting point of an Application Programming Interface (API), that can be used by any client that can interact with a RESTful API, such as single-page HTML5 applications, mobile applications etc.
Contents
- 1 Objectives
- 2 Technology
- 3 Method
- 3.1 Overview
- 3.2 Configuration
- 3.3 Implementation
- 3.4 Deploy the Web Service to GlassFish
- 4 Test the Web Service with an HTTP Client
- 5 Conclusion
- 6 Resources and Links
Technology
- Database: MySQL 5.6.16
- MySQL Workbench 6
- Application Server: GlassFish 4.0
- JPA 2.1: EclipseLink
- JAX-RS 2.0: Jersey
- JAXB: MOXy
- IDE: Eclipse IDE for Jave EE Developers – Kepler
- Java EE 7
The Java Persistence API
The Java Persistence API (JPA) is a lightweight framework for mapping POJOS’s to database tables. In other words, it is an Object Relational Mapper. Classes annotated with JPA are called Entities. Creating an Entity is as simple as annotating a POJO with @Entity.
The built in JPA provider in GlassFish is EclipseLink (which is also the reference JPA implementation). Other JPA providers include Hibernate and DataNucleus.
Representational State Transfer – REST
REST is an architectural style based on a set of principles that reduce the complexity in the server and allows for easy scaling.
- Addressable Resources: In REST, everything is a resource, and these resources are found at unique addresses, URI’s.
- A Uniform, Constrained Interface: We interact with the server through simple methods. In HTTP, the main ones are POST, GET, PUT and DELETE.
- Representation-Oriented: Representation of the resource (eg. JSON and XML) are what is exchanged between the client and server.
- Communicate Statelessly: No state is stored on the server.
- Hypermedia As The Engine Of Application State (HATEOAS): The client discovers new related resources by using hyper-links returned by the server. We do not implement this however.
The Java API for RESTful Web Services
The Java API for RESTful Web Services (JAX-RS) simplifies the creation of RESTful web service by using annotations on a POJO that defines the URI path and the functions that handle HTTP request.
Jersey is the reference implementation of JAX-RS and comes built into GlassFish.
The Java Architecture for XML Binding
The Java Architecture for XML Binding (JAXB) gives the ability to marshal Java objects to and from XML.
EclipseLink MOXy is a JAXB provider in GlassFish and is also the default JSON-Binding provider in GlassFish 4. This is how we can get JSON representation even though the annotation are JAXB.
Method
Overview
The premise is, we are creating a web service for a small business, and the first aspect of this service is the ability to create and edit a simple text-based product (item) price list. We go about this by creating a single database table in MySQL called ‘item’, from which a Java Persistence API (JPA) Entity will be derived to create the persistence layer. A JAX-RS annotated POJO (Plain Old Java Object) will then be created to implement the RESTful service layer. The application will be deployed on a local GlassFish server and interacted with using the Postman HTTP client. The post will cover configuration, but not installation of the various technologies.
Configuration
Create a New MySQL Database Schema
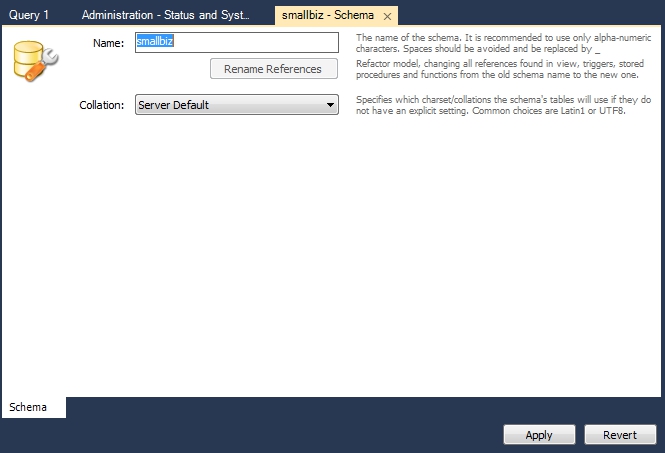
We can use MySQL Workbench 6 to create a new schema to use for this project. Log into the workbench and click the ‘create a new schema in connected server‘ icon. In the window that appears type the name of the schema (smallbiz) and apply.
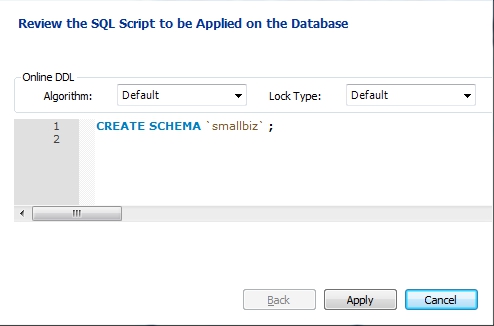
Apply the SQL Script
Click Finish. We now have an empty database to work with.
Configure the Eclipse IDE for Java EE – Kepler
Eclipse for Java EE comes with built in Maven capabilities via m2e (formerly m2eclipse) and m2e-wtp. We will use these to manage the project dependencies and facets.
Add Maven Central Archetype Catalogue
Eclipse JEE does not seem to come with the Maven Central Archetype Catalogue by default. Ensure that the Maven Central Repository, http://repo1.maven.org/maven2/archetype-catalog.xml, is added to the catalogue. Go to Window > Preferences > Maven > Archetypes. Click on Add Remote Catalog… button and add the url mentioned earlier. Though we do not do it for this project, this will become useful when creating projects from the numerous Maven Archetypes that are available from from this repository.
Enable Maven to Download JavaDocs
JavaDocs can be viewed from right within the Eclipse IDE in certain contexts, such as hovering the cursor over a class, or opened in a browser. This is extremely important to the process of learning what the code does, especially for the parts that are not explained in detail for this post. For the JavaDocs to be available for the dependencies Maven downloads, we enable download JavaDoc by going Window > Preferences > Maven and enable Download Artifact JavaDoc
Update Maven Index
If the Maven Index in Eclipse was never updated, it may be empty. To populate it, select the Maven view by going Window > Show View > Other… Under the Maven folder, select Maven Repositories.
In the Maven Repositories view, expand Global Reposities, then right click central and select Rebuild Index. Click OK at the dialogue that follows. It may take a while for this operation to compete.
Add GlassFish Tools to Eclipse
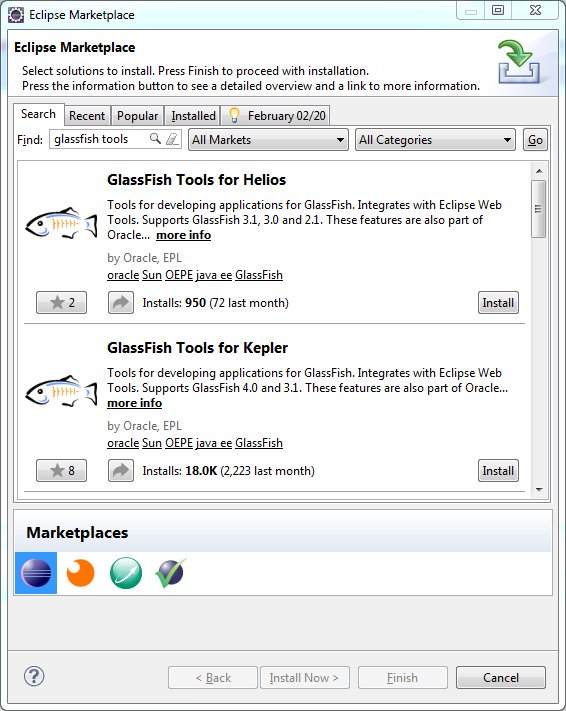
In order to connect to the GlassFish Server from within Eclipse, we add GlassFish Tools. Go to Help > Eclipse Marketplace and search for GlassFish Tools. Install the version that matches the Eclipse version (Kepler in this case)
Click Install, Confirm and then Accept the license agreement on the following screens. Click Yes to restart Eclipse after the installation is complete.
Connect Eclipse to GlassFish
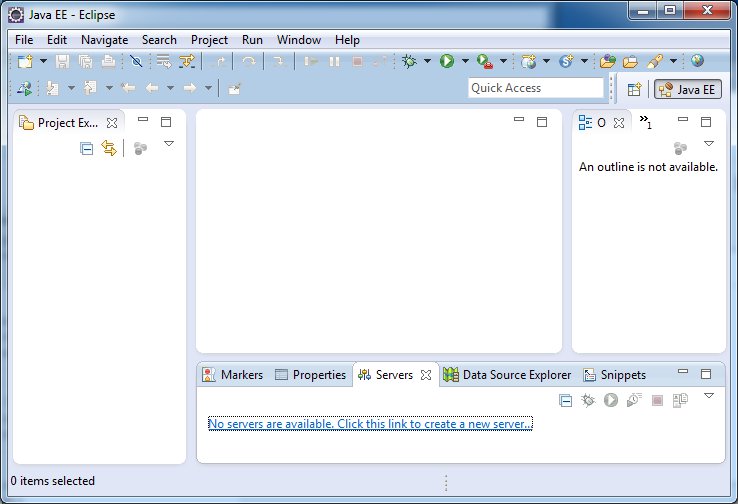
The default layout of the Java EE perspective in eclipse has a Servers tab located in the bottom section. If there are currently no servers, click on text in the content area of the tab to create a new connection to a server. Else, right click in the content are of the tab and select New > Server.
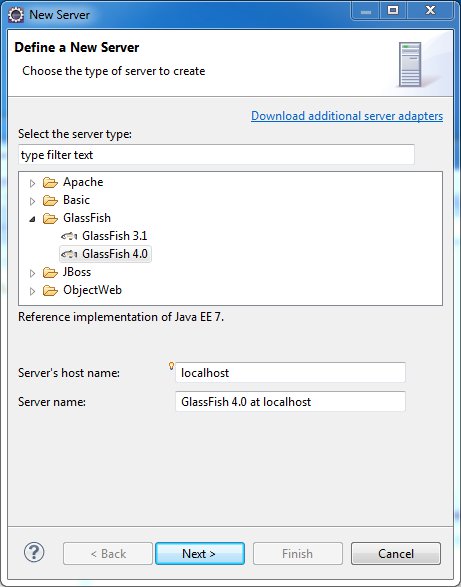
Select GlassFish 4.0 from the list and click Next.
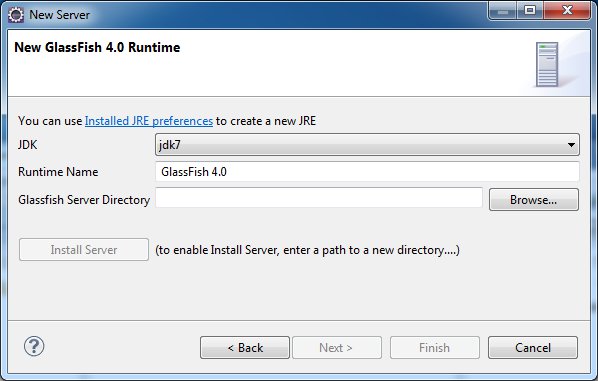
Select jdk7 as the JDK and browse to the folder where GlassFish is installed. Confirmatory text will be displayed below the last input field if it is found.
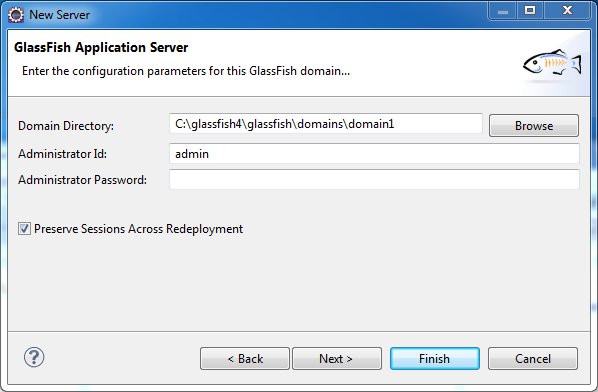
Ensure the correct domain directory is selected (the default is domain1) and enter the Administrator credentials (default Id is ‘admin’, there is no password as the default)
The GlassFish Server should now be present in the Servers view.
Connect Eclipse to MySQL
Download the MySQL JDBC driver (you can find it here) and extract the files to a convenient folder.
In the Data Source Explorer tab, right click the Database Connections folder and select New
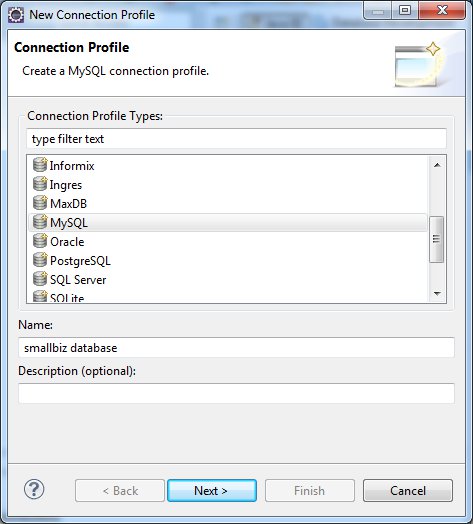
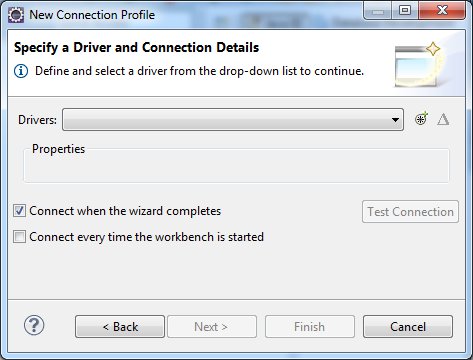
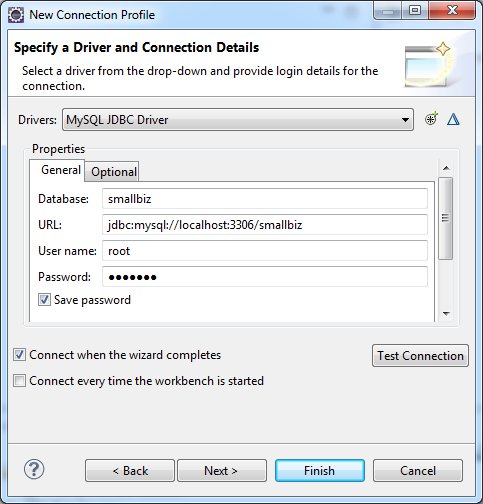
Select MySQL as the connection profile type and give the connection a name (smallbiz database). Select next.
Click the icon to the right of the Drivers drop down list for New Driver Definition
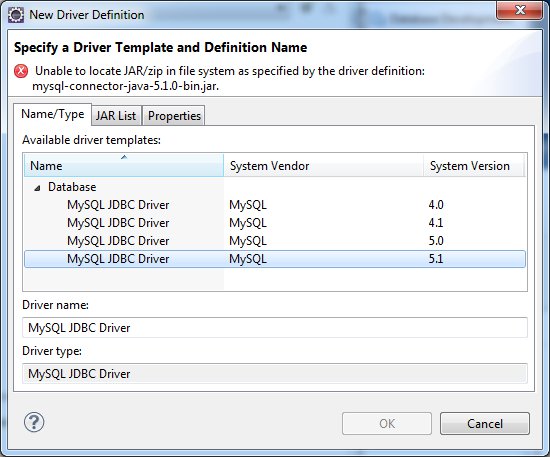
On the Name/Type tab, select an appropriate MySQL driver template (5.1 for this project), then click the Jar List tab.
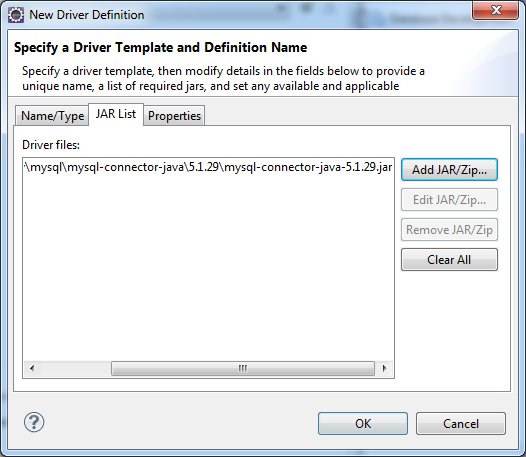
Remove the existing Driver File then click Add JAR/Zip… Browse to folder where the MySQL connector is located and select it.
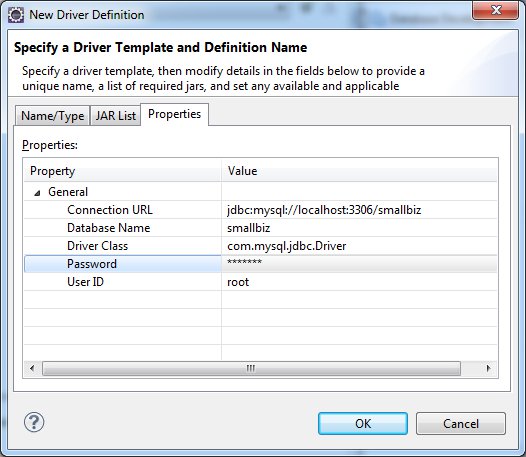
On the properties tab, enter the Connection URL (jdbc:mysql://localhost:3306/smallbiz), Database Name (smallbiz), Password and User ID if different from the default. Click OK.
Check the box to Save password for convenience. Click Test Connection then Finish (or Next to see the summary then Finish)
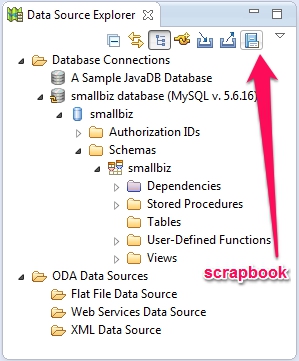
The new connection is shown in the Data Source Explorer.
Create a Database Table Using Eclipse
To make life easier when working with the database from within Eclipse, we can switch to the Database Perspective, Window > Open Perspective > Other… > Database Development
The database currently has no tables. We will create a table by writing SQL in the Scrapbook. Click the Scrapbook icon, located at the top right of the Data Source Explorer tab.
Enter the SQL to create a (item) table.
CREATE TABLE item (
	id VARCHAR(36) NOT NULL,
	itemName TEXT NOT NULL,
	itemDescription TEXT,
	itemPrice DOUBLE,
	PRIMARY KEY (id)
)
Right click within the Scrapbook window and Execute All.
Create a MySQL JDBC Connection Pool and Resource in GlassFish
The application needs to be able to communicate with the MySQL database when it is deployed to the GlassFish Server. To enable this, we first copy the MySQL JDBC driver to $glassfish_install_folde\glassfish\lib\ext.
Once the JDBC driver is in place, Start GlassFish (or restart GlassFish if already started). You can do so by right clicking the connection created in the Server tab of Eclipse.
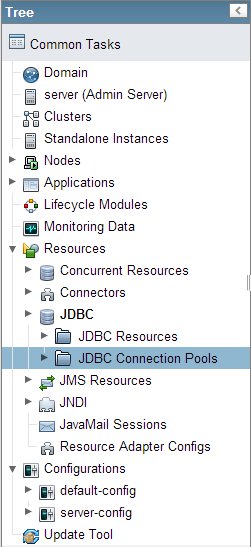
Login to the GlassFish Server Administration Console (located at http://localhost:4848 by default) and select JDBC connection pool
Click the New… button to create a new JDBC Connection Pool
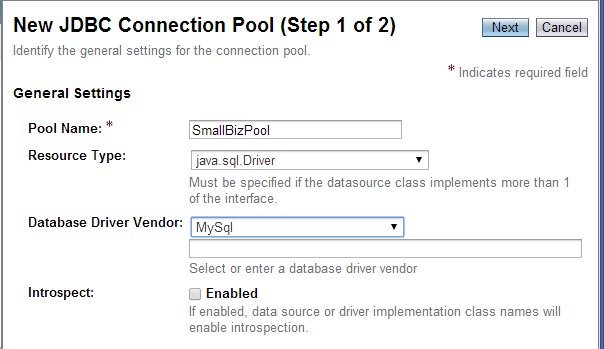
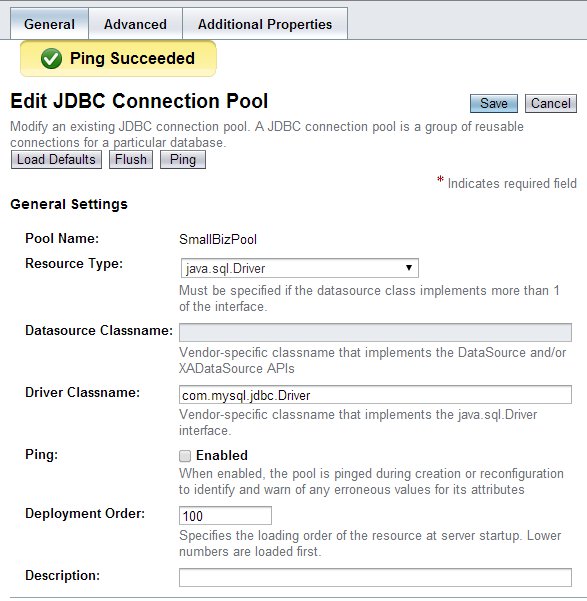
Enter a Pool Name (SmallBizPool), select the Resource Type as javax.sql.Driver (this will give the simplest set of Addition Properties on the next screen) and the Database Driver Vendor as MySQL and click Next.
The Initial Minimum Pool Size can be set to zero since there is no need for eight on a development machine. The focus however, is the bottom section of the screen Additional Properties, which we set as follows
URL: jdbc:mysql://localhost:3306/smallbiz
user: yourUser (root in my set-up)
password: yourPassword
Click Finish.
Now that we have created the pool, click on the Pool Name then Ping the connection on the screen that follows to ensure that GlassFish can connect.
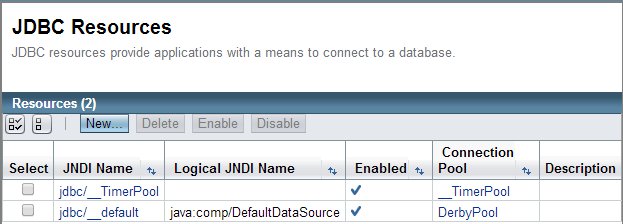
To create the JDBC Resource go to Resources > JDBC > JDBC Resources and click New.
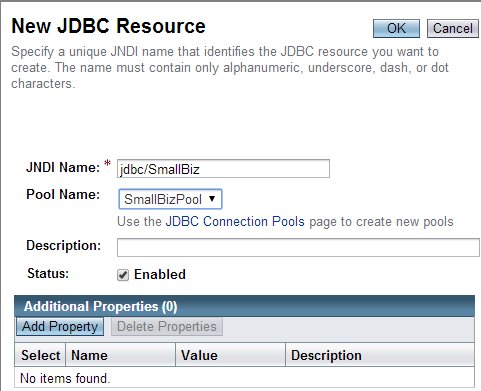
Create a JNDI Name (jdbc/SmallBiz) and select the Pool Name (SmallBizPool). Click OK.
Implementation
Create a New Maven Project in Eclipse
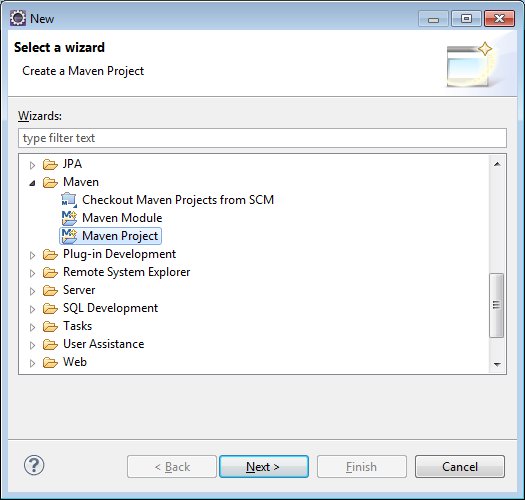
We will create a Maven Project from scratch. Go to File > New > Other… then select Maven Project from under the Maven folder.
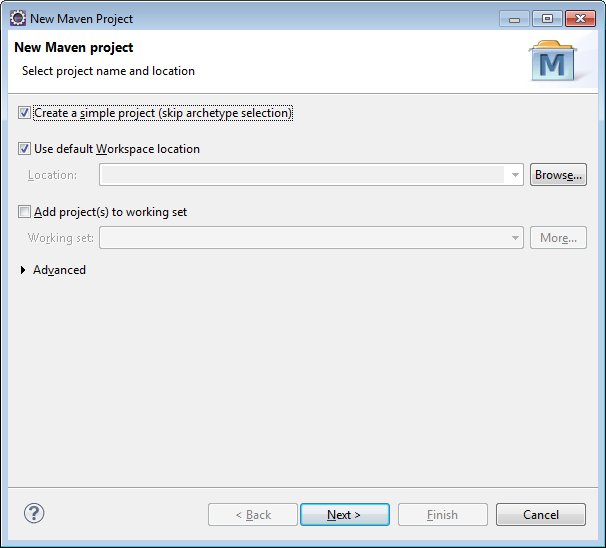
Since we’re doing everything from scratch, choose create a simple project.
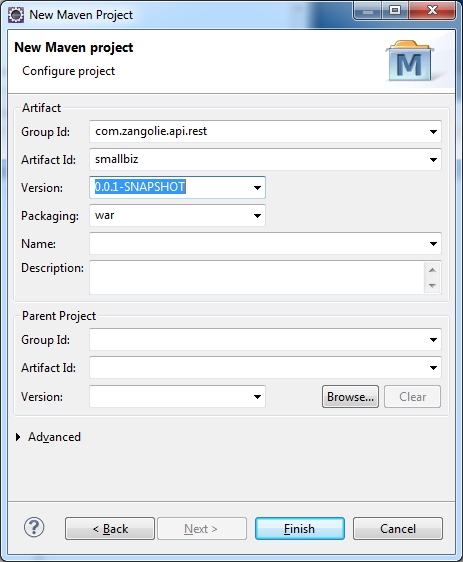
Enter the coordinates (Group Id, Artifact Id, Version) and Package type (war), then click Finish
Set the Maven Compiler to 1.7
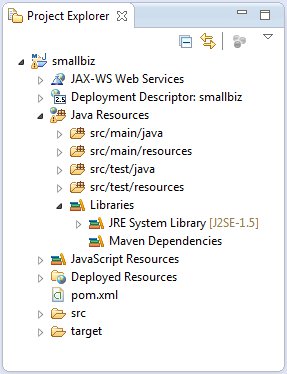
Notice, if the Java Resources > Libraries folder is expanded, we see that JRE System Library is J2SE-1.5
Right click the pom.xml file and select Open With > Maven POM Editor. Add the following just before the closing tag
	<build>
		<plugins>
			<plugin>
				<artifactId>maven-compiler-plugin</artifactId>
				<version>3.1</version>
				<configuration>
					<source>1.7</source>
					<target>1.7</target>
				</configuration>
			</plugin>
		</plugins>
	</build>
Right click the project Maven > Update Project the click OK on the screen that follows
JRE System Library is now J2SE-1.7
Create a JPA Persistence Layer
Add EclipseLink Dependency
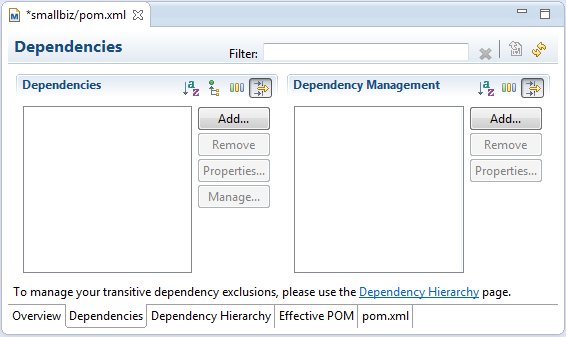
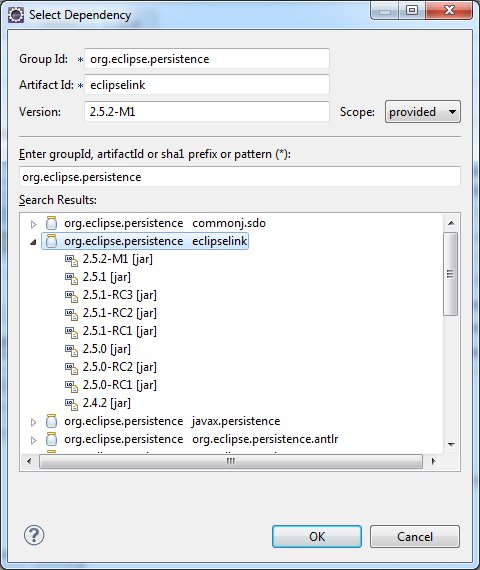
In the open pom.xml file, select the Dependencies tab click the Add button that is at the centre of the screen.
EclipseLink’s Maven dependency is available at Maven Central under the Group Id org.eclipse.persistence.
In the search field titled “Enter groupId, artifactId or sha1 prefix or pattern (*):” enter org.eclipse.persistence. You can click on “org.eclipse.persistence eclipselink” to select the most recent version, or expand the list and select a previous version.
Notice we use provided as the scope since GlassFish 4 includes EclipseLink as the default JPA provider. Click OK to add the dependency.
Add persistence.xml File
Create folder src\main\webapp\WEB-INF\classes\META-INF and create a persistence.xml file.
<?xml version="1.0" encoding="UTF-8"?>

<persistence version="2.1"
	xmlns="http://xmlns.jcp.org/xml/ns/persistence" xmlns:xsi="http://www.w3.org/2001/XMLSchema-instance"
	xsi:schemaLocation="http://xmlns.jcp.org/xml/ns/persistence http://xmlns.jcp.org/xml/ns/persistence/persistence_2_1.xsd">
	<persistence-unit name="testPU" transaction-type="JTA">
		<jta-data-source>jdbc/SmallBiz</jta-data-source>
	</persistence-unit>
</persistence>
Right click the project Maven > Update Project the click OK on the screen that follows
Now right click the project and go Properties > Project Facets and see that m2e-wtp enabled the JPA facet.
Create the JPA Entity from the Database Table
Create a new package under Java Resources > src/main/java (….smallbiz.entities)
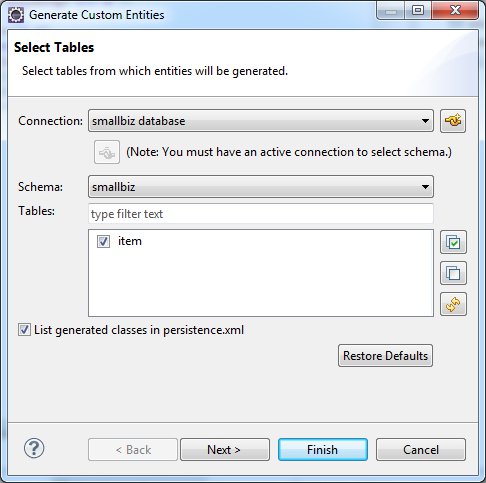
Right click the package and select New > JPA Entities from Table
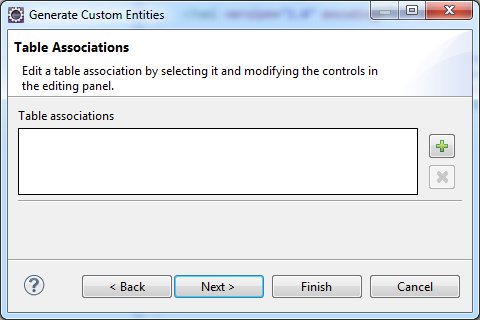
Since there is only one table in this database. There are no Table Association to edit
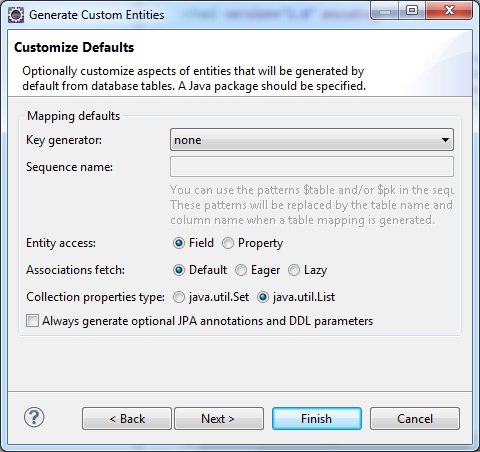
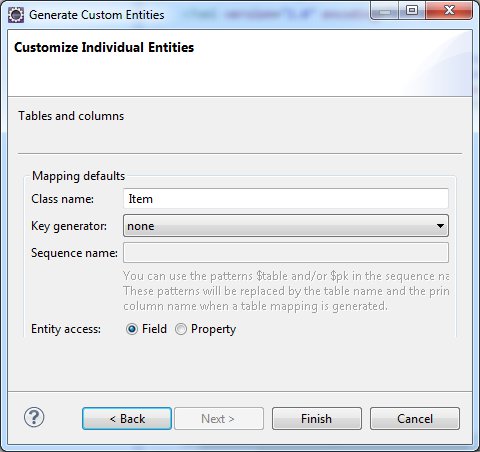
Our database does not generate the keys for the database table
The code generated
package com.zangolie.smallbiz.entities;

import java.io.Serializable;

import javax.persistence.*;

/**
 * The persistent class for the item database table.
 *
 */

@Entity
@NamedQuery(name="Item.findAll", query="SELECT i FROM Item i")
public class Item implements Serializable {
	private static final long serialVersionUID = 1L;

	@Id
	private String id;

	@Lob
	private String itemDescription;

	@Lob
	private String itemName;

	private double itemPrice;

	public Item() {
	}

	public String getId() {
		return this.id;
	}

	public void setId(String id) {
		this.id = id;
	}

	public String getItemDescription() {
		return this.itemDescription;
	}

	public void setItemDescription(String itemDescription) {
		this.itemDescription = itemDescription;
	}

	public String getItemName() {
		return this.itemName;
	}

	public void setItemName(String itemName) {
		this.itemName = itemName;
	}

	public double getItemPrice() {
		return this.itemPrice;
	}

	public void setItemPrice(double itemPrice) {
		this.itemPrice = itemPrice;
	}

}
Annotate JPA Entity with JAXB
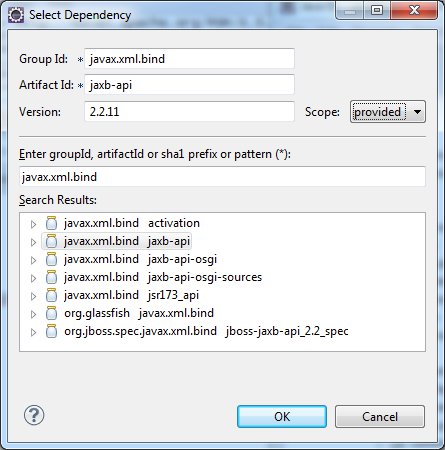
In order to be able to convert the entity to xml or json we must annotate it as a JAXB XmlRootElement. First we add the JAXB dependency
Then we annotate the code
//...
import javax.persistence.*;
import javax.xml.bind.annotation.XmlRootElement;

/**
 * The persistent class for the item database table.
 *
 */
@XmlRootElement
@Entity
@NamedQuery(name="Item.findAll", query="SELECT i FROM Item i")
public class Item implements Serializable {
	private static final long serialVersionUID = 1L;
//...
Annotate with EclipseLink’s UuidGenerator
We are using UUID’s as the primary key so that it can be generated anywhere. EclipseLink has an @UuidGenerator annotation we can use to generate UUID’s.
//...
import org.eclipse.persistence.annotations.UuidGenerator;

/**
 * The persistent class for the item database table.
 *
 */
@UuidGenerator(name="UUID")
@XmlRootElement
@Entity
@NamedQuery(name="Item.findAll", query="SELECT i FROM Item i")
public class Item implements Serializable {
	private static final long serialVersionUID = 1L;

	@Id
	@GeneratedValue(generator="UUID")
	private String id;
//...
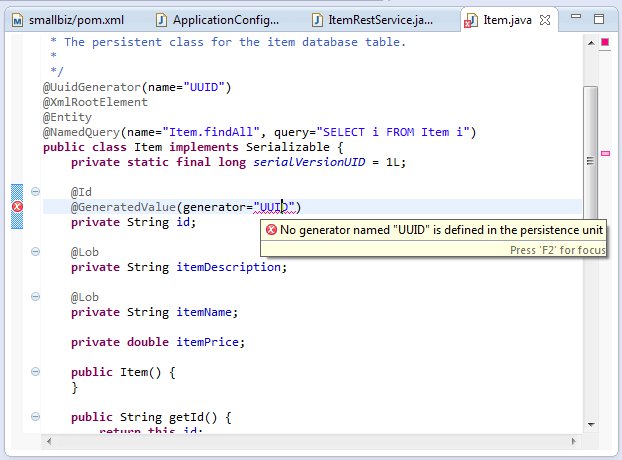
There seems to be a bug in Eclipse, because it kicks up a fuss about the generator name not being defined in the persistence unit, but the generator name is defined with the @UuidGenerator annotation.
To get around this, we change the error to a warning in Window > Preferences > Java Persistence > JPA > Errors/Warnings > Queries and Generators and set the severity level of “Generator is not defined in the persistence unit” to warning.
Create a JAX-RS RESTful Service Layer
Add Servelet 3.1 Dependency
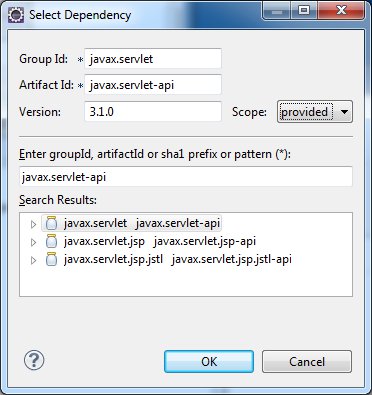
JAX-RS 2.0 requires Servlet 3.1 (as well as JDK 7), so we add the Maven dependency.
Right click the project Maven > Update Project then click OK on the screen that follows. If you now check the project facets by right clicking the project, then Properties > Project Facets, you will notice m2e-wtp updates the Dynamic Web Module to 3.1
Add Jersey Dependency
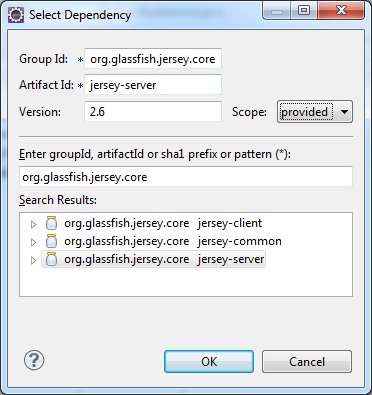
Jersey is the JAX-RS implementation in GlassFish. We only need the Jersey Server dependency.
Right click the project Maven > Update Project the click OK on the screen that follows. If you now check the project facets, you will notice m2e-wtp has enabled JAX-RS 2.0
Add EJB Dependency
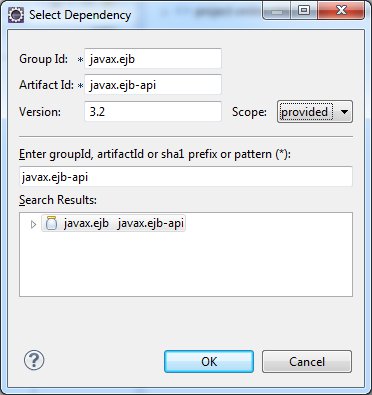
We shall annotate the rest resource with @Stateless thus turning it into an Enterprise Java Bean. We therefore add a dependency to javax.ejb-api.
Write the REST Resource
Though it does not have to be, we put the REST resource in a separate package (…smallbiz.services.rest). We create a new class (ItmeRestResource) and use JAX-RS annotations to create the RESTful service.
package com.zangolie.smallbiz.services.rest;

import java.net.URI;
import java.util.Collection;

import javax.ejb.Stateless;
import javax.persistence.EntityManager;
import javax.persistence.PersistenceContext;
import javax.persistence.TypedQuery;
import javax.ws.rs.BadRequestException;
import javax.ws.rs.Consumes;
import javax.ws.rs.DELETE;
import javax.ws.rs.GET;
import javax.ws.rs.NotFoundException;
import javax.ws.rs.POST;
import javax.ws.rs.PUT;
import javax.ws.rs.Path;
import javax.ws.rs.PathParam;
import javax.ws.rs.Produces;
import javax.ws.rs.core.Context;
import javax.ws.rs.core.MediaType;
import javax.ws.rs.core.Response;
import javax.ws.rs.core.UriInfo;

import com.zangolie.smallbiz.entities.Item;

@Path("/item")
@Produces ({MediaType.APPLICATION_JSON, MediaType.APPLICATION_XML})
@Consumes ({MediaType.APPLICATION_JSON, MediaType.APPLICATION_XML})
@Stateless
public class ItemRestService {
	//the PersistenceContext annotation is a shortcut that hides the fact
	//that, an entity manager is always obtained from an EntityManagerFactory.
	//The peristitence.xml file defines persistence units which is supplied by name
	//to the EntityManagerFactory, thus  dictating settings and classes used by the
	//entity manager
	@PersistenceContext(unitName = "testPU")
	private EntityManager em;

	//Inject UriInfo to build the uri used in the POST response
	@Context
	private UriInfo uriInfo;

	@POST
	public Response createItem(Item item){
		if(item == null){
			throw new BadRequestException();
		}
		em.persist(item);

		//Build a uri with the Item id appended to the absolute path
		//This is so the client gets the Item id and also has the path to the resource created
		URI itemUri = uriInfo.getAbsolutePathBuilder().path(item.getId()).build();

		//The created response will not have a body. The itemUri will be in the Header
		return Response.created(itemUri).build();
	}

	@GET
	@Path("{id}")
	public Response getItem(@PathParam("id") String id){
		Item item = em.find(Item.class, id);

		if(item == null){
			throw new NotFoundException();
		}

		return Response.ok(item).build();
	}

	//Response.ok() does not accept collections
	//But we return a collection and JAX-RS will generate header 200 OK and
	//will handle converting the collection to xml or json as the body
	@GET
	public Collection<Item> getItems(){
		TypedQuery<Item> query = em.createNamedQuery("Item.findAll", Item.class);
		return query.getResultList();
	}

	@PUT
	@Path("{id}")
	public Response updateItem(Item item, @PathParam("id") String id){
		if(id == null){
			throw new BadRequestException();
		}

		//Ideally we should check the id is a valid UUID. Not implementing for now
		item.setId(id);
		em.merge(item);

		return Response.ok().build();
	}

	@DELETE
	@Path("{id}")
	public Response deleteItem(@PathParam("id") String id){
		Item item = em.find(Item.class, id);
		if(item == null){
			throw new NotFoundException();
		}
		em.remove(item);
		return Response.noContent().build();
	}

}
We annotate the entire class with @Produces and @ Consumes and the media types for JSON and XML in both cases. This means that the functions annotated with the HTTP methods require no further annotation to produce or consume both JSON or XML.
The first @Path annotation defines the relative path (/item) that exposes the resource to HTTP clients. The relative path to a specific resource is annotated with @Path(“{id}”) and thus makes use of the Entity’s id attribute (/item/someUUID).
The @POST, @GET, @PUT and @DELETE annotations are used for the functions that handle those HTTP requests.
Create the Application Class
We need to tell Jersey which url pattern it must intercept as our JAX-RS endpoint (base URI). We will use an Application Class instead of a web.xml file for this purpose. The class could be added to any package in the project, we choose the same package as the JAX-RS annotated class. We set ‘rest’ as the path by using the @ApplicationPath. This will result in path of http://localhost:8080/your_project_name/rest (http://localhost:8080/smallbiz/rest) on our local GlassFish server.
package com.zangolie.smallbiz.services.rest;

import javax.ws.rs.ApplicationPath;
import javax.ws.rs.core.Application;

@ApplicationPath("rest")
public class ApplicationConfig extends Application {

}
Since we are using an Application Class instead of a web.xml file, we have to add a bit of xml to the pom.xml file to tell Maven not to complain about the missing web.xml file. In the build element of the pom add the following plugin to the plugins.
			<plugin>
				<artifactId>maven-war-plugin</artifactId>
				<version>2.4</version>
				<configuration>
					<failOnMissingWebXml>false</failOnMissingWebXml>
				</configuration>
			</plugin>
Maven update after the code is added
Deploy the Web Service to GlassFish
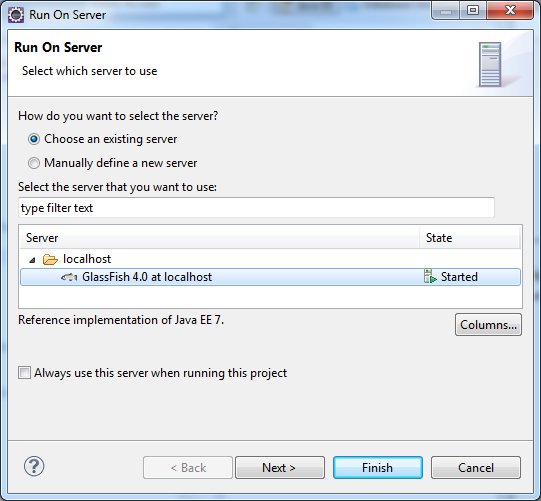
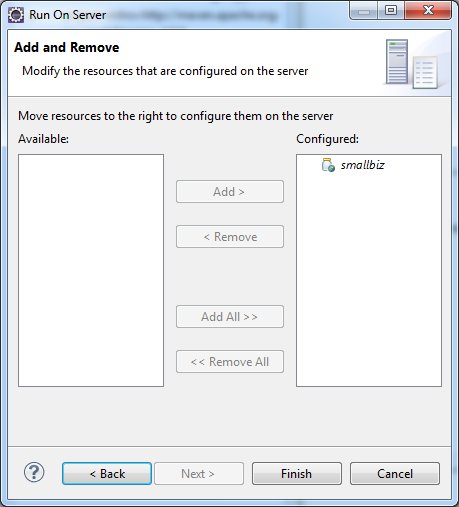
Right click the project Run As > Run on Server
We now set Eclipse to automatically publish to GlassFish when we change the code. Double click the GlassFish Server on the Server view. Expand the Publishing expandable list and select Automatically publish when resources change.
Test the Web Service with an HTTP Client
We will use Postman as the HTTP Client to test the RESTful service. However, any HTTP client should work.
POST
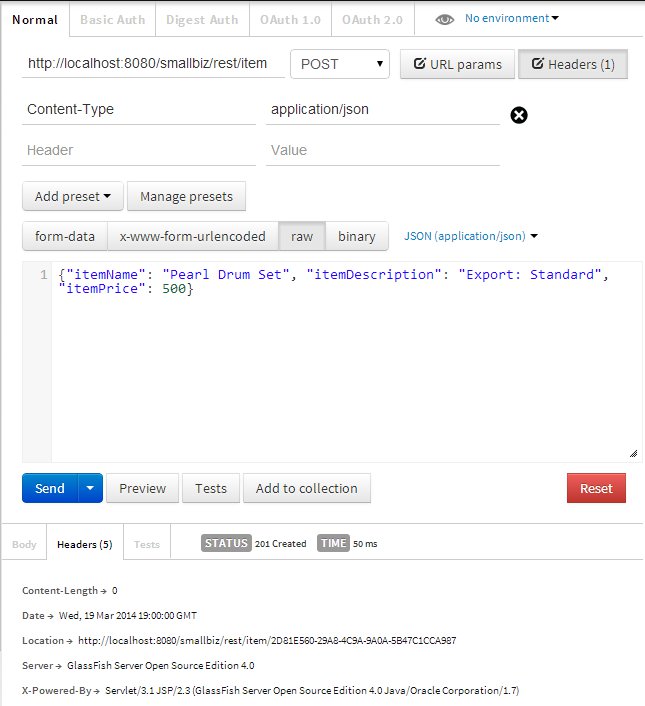
Use http://localhost:8080/your_project_name/rest/item (http://localhost:8080/smallbiz/rest/item) as the request url. Select POST from the drop down list. Click the Headers button then enter Header: Content-Type and Value: application/json. Click the raw button and select application/json from the drop down list to the right of it.
Enter a json object and POST it by clicking Send. You can preview
POST a few json objects to the server.
GET
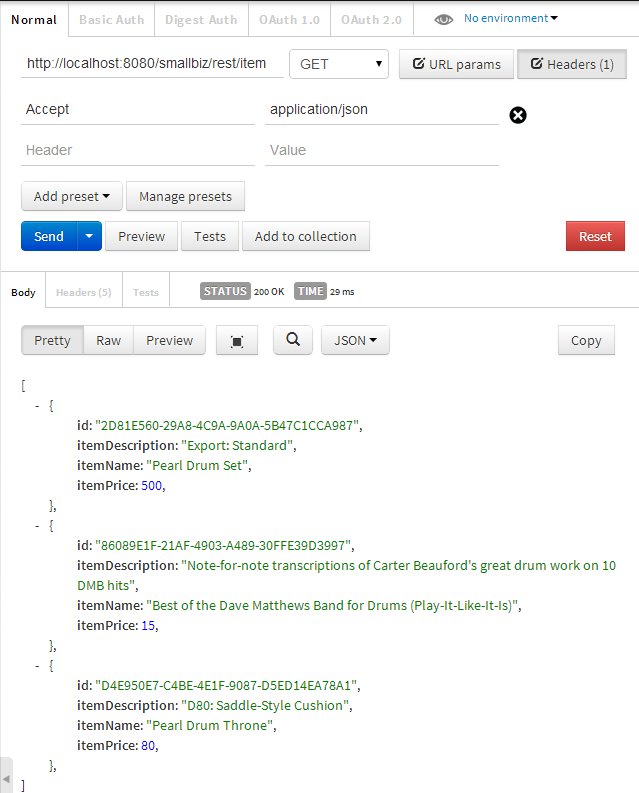
We set the Accept header to either application/json or application/xml. Using the base url will get all items, if an id is appended to the base url, then that item will be returned.
PUT
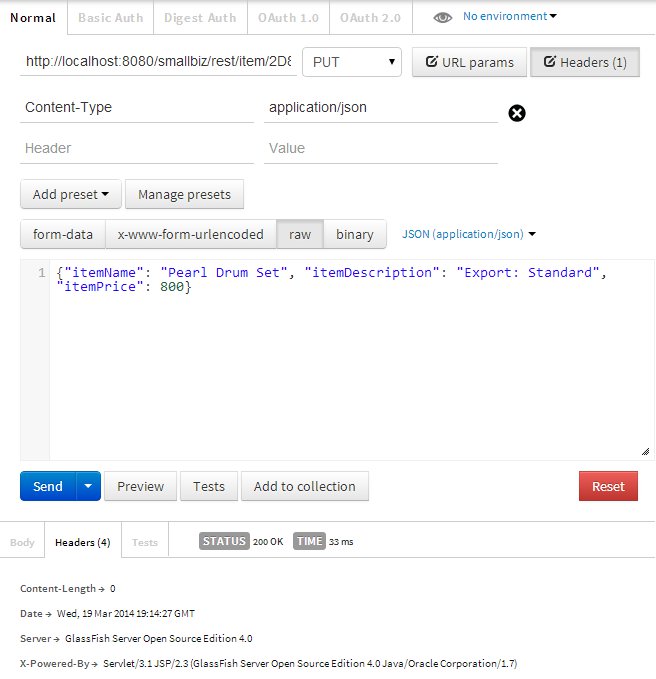
PUT can be used to update an existing resource or to save a resource that is created with an id on the client. Note that a partial update is not possible with the HTTP PUT method (will probably look into doing a PATCH update for another post).
DELETE
No Accept header etc need to be sent for DELETE. Simply send the DELETE request to a valid id.
Conclusion
I hope this post is a useful starting point for creating as RESTful Web Service in Java that someone can start experimenting with and expanding upon.
Resources and Links
These are some of the resources I found useful while learning how to go about implementing a RESTful Web Service in Java.
Books
Beginning Java EE 7
Pro JPA 2
RESTful Java with JAX-RS 2.0
Web Sites
Create rich data-centric web applications using JAX-RS, JPA, and Dojo







That is an awesome tutorial!!!
Searched for days and then found this… THANK YOU!
You are welcome. Glad it was helpful.
Thanks for the tutorial. Very helpful. I would like to printout your tutorial; do you have a pdf file of it or something that I can print?
Here is a link to a pdf of the post. I also put a link in the Objectives section just before the Contents.
Hi ZanGOline..this tutorial is so interesting!.. i’m trying to do it, but i got this error in the Create a “MySQL JDBC Connection Pool and Resource in GlassFish” step
Would you help me please? give me a clue..
2015-10-31T13:11:28.894-0300|Warning: StandardWrapperValve[FacesServlet]: Servlet.service() for servlet FacesServlet threw exception
java.lang.IllegalStateException: getOutputStream() has already been called for this response
at org.apache.catalina.connector.Response.getWriter(Response.java:777)
at org.apache.catalina.connector.ResponseFacade.getWriter(ResponseFacade.java:224)
at com.sun.faces.context.ExternalContextImpl.getResponseOutputWriter(ExternalContextImpl.java:851)
at com.sun.faces.context.PartialViewContextImpl.createPartialResponseWriter(PartialViewContextImpl.java:504)
at com.sun.faces.context.PartialViewContextImpl.access$300(PartialViewContextImpl.java:79)
at com.sun.faces.context.PartialViewContextImpl$DelayedInitPartialResponseWriter.getWrapped(PartialViewContextImpl.java:642)
at javax.faces.context.PartialResponseWriter.startDocument(PartialResponseWriter.java:120)
at com.sun.faces.context.AjaxExceptionHandlerImpl.handlePartialResponseError(AjaxExceptionHandlerImpl.java:202)
at com.sun.faces.context.AjaxExceptionHandlerImpl.handle(AjaxExceptionHandlerImpl.java:127)
at javax.faces.context.ExceptionHandlerWrapper.handle(ExceptionHandlerWrapper.java:100)
at com.sun.faces.lifecycle.Phase.doPhase(Phase.java:119)
at com.sun.faces.lifecycle.LifecycleImpl.render(LifecycleImpl.java:219)
at javax.faces.webapp.FacesServlet.service(FacesServlet.java:659)
at org.apache.catalina.core.StandardWrapper.service(StandardWrapper.java:1682)
at org.apache.catalina.core.ApplicationFilterChain.internalDoFilter(ApplicationFilterChain.java:344)
at org.apache.catalina.core.ApplicationFilterChain.doFilter(ApplicationFilterChain.java:214)
at com.sun.webui.jsf.util.UploadFilter.doFilter(UploadFilter.java:233)
at org.apache.catalina.core.ApplicationFilterChain.internalDoFilter(ApplicationFilterChain.java:256)
at org.apache.catalina.core.ApplicationFilterChain.doFilter(ApplicationFilterChain.java:214)
at org.apache.catalina.core.StandardWrapperValve.invoke(StandardWrapperValve.java:316)
at org.apache.catalina.core.StandardContextValve.invoke(StandardContextValve.java:160)
at org.apache.catalina.core.StandardPipeline.doInvoke(StandardPipeline.java:734)
at org.apache.catalina.core.StandardPipeline.doChainInvoke(StandardPipeline.java:678)
at com.sun.enterprise.web.WebPipeline.invoke(WebPipeline.java:97)
at org.apache.catalina.core.StandardHostValve.invoke(StandardHostValve.java:174)
at org.apache.catalina.connector.CoyoteAdapter.doService(CoyoteAdapter.java:416)
at org.apache.catalina.connector.CoyoteAdapter.service(CoyoteAdapter.java:283)
at com.sun.enterprise.v3.services.impl.ContainerMapper$HttpHandlerCallable.call(ContainerMapper.java:459)
at com.sun.enterprise.v3.services.impl.ContainerMapper.service(ContainerMapper.java:167)
at org.glassfish.grizzly.http.server.HttpHandler.runService(HttpHandler.java:206)
at org.glassfish.grizzly.http.server.HttpHandler.doHandle(HttpHandler.java:180)
at org.glassfish.grizzly.http.server.HttpServerFilter.handleRead(HttpServerFilter.java:235)
at org.glassfish.grizzly.filterchain.ExecutorResolver$9.execute(ExecutorResolver.java:119)
at org.glassfish.grizzly.filterchain.DefaultFilterChain.executeFilter(DefaultFilterChain.java:283)
at org.glassfish.grizzly.filterchain.DefaultFilterChain.executeChainPart(DefaultFilterChain.java:200)
at org.glassfish.grizzly.filterchain.DefaultFilterChain.execute(DefaultFilterChain.java:132)
at org.glassfish.grizzly.filterchain.DefaultFilterChain.process(DefaultFilterChain.java:111)
at org.glassfish.grizzly.ProcessorExecutor.execute(ProcessorExecutor.java:77)
at org.glassfish.grizzly.nio.transport.TCPNIOTransport.fireIOEvent(TCPNIOTransport.java:536)
at org.glassfish.grizzly.strategies.AbstractIOStrategy.fireIOEvent(AbstractIOStrategy.java:112)
at org.glassfish.grizzly.strategies.WorkerThreadIOStrategy.run0(WorkerThreadIOStrategy.java:117)
at org.glassfish.grizzly.strategies.WorkerThreadIOStrategy.access$100(WorkerThreadIOStrategy.java:56)
at org.glassfish.grizzly.strategies.WorkerThreadIOStrategy$WorkerThreadRunnable.run(WorkerThreadIOStrategy.java:137)
at org.glassfish.grizzly.threadpool.AbstractThreadPool$Worker.doWork(AbstractThreadPool.java:591)
at org.glassfish.grizzly.threadpool.AbstractThreadPool$Worker.run(AbstractThreadPool.java:571)
at java.lang.Thread.run(Thread.java:745)
Hi Enrique, seems to be a problem with recent builds of glassfish caused by an integration problem with Jersey 2.16. You can find more details of the issue at Cannot create JDBC Connection Pool.
You may have to downgrade to an earlier version of GlassFish until the issue is resolved.
thanks a lot!!.. for your quickly answer.. I will! I was reading something about this before youe answer.
you’re right! using glassfish 3.1.1 work fine
Nice! The tutorial uses GlassFish 4.0 so that should work as well.
Thanks for the tutorial.
I’m having this error message “The server encountered an internal error that prevented it from fulfilling this request.” when return query.getResultList();
I debug my project in verify the data and thats is ok, but i received this answer in the return method.